Saturday, 20 April 2024 04:12 AM
OR
Login using
So you bought a new fancy digital camera thinking you’ll become the next Annie Leibovitz or perhaps the next Rinko Kawauchi. However, now that you actually have to use it, you find out that things aren’t as easy as they look. There are a gazillion modes to shoot on and you’ve no idea what to do and sometimes the photos come out too dark while others come out too overexposed. Don’t worry, we’ve all been there.
Just because you’re a little confused about it doesn’t mean that you should give up photography altogether. You could take a class on photography or, if you are too busy, surf the internet to know more about how your camera works and how to take great pictures from it.
But to make things a little easy, here we have compiled the very basics of what you need to know about photography to kickstart your newfound hobby and not get frustrated by it too soon.
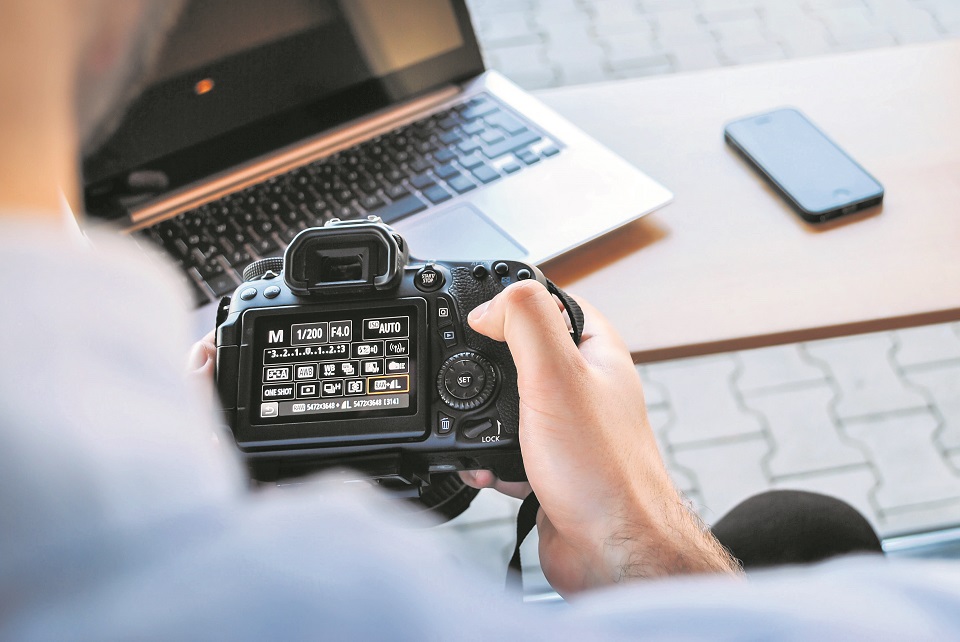
Three basics of photography
If you know about these three basics terms of photography, you can easily use the manual mode or the aperture mode—which are extremely important if you want to improve your skills as a photographer. These three terms are ISO, shutter speed and aperture. In manual mode, you have the ability to set these basics by hand and thus can take full freedom in how the picture comes out.
A good photograph is basically the proper blend of all three of these basic terms.
Let’s go a little into the details of what they actually do and how to customize them to take great photographs.
Aperture is of utmost importance
In optics, an aperture is a hole or an opening through which light travels. In layman terms, as the aperture widens, more light is allowed into the camera and as it narrows, less light enters the camera. Aperture determines your depth of field i.e. how far away can your camera capture details without them blurring.
Aperture is one of three camera settings that determine an image’s exposure, or how light or dark it is. The aperture is the preferred setting to set first as it directly influences how much of your scene is in focus. But if you are looking to create a motion blur, then it is second to the shutter speed.
Aperture is measured in f-stops in a camera; a small f-stop like f/1.8 is a wide opening, a large f-stop like f/22 is a very narrow one. Aperture also affects how much of the image is in focus—wide apertures result in that creamy, unfocused background while narrow apertures keep the image sharp.
Know more about shutter speed
Once the light passes through the aperture of the lens, it reaches the shutter. Now you need to decide how much of that light you’re going to allow into the camera and that’s where shutter speed comes in. Most of the time, we prefer a sharp and cleaner image without any blurs.
And so, ordinarily, you only want a very small fraction of a second (for example 1/250) to prevent motion blur. However, different shutter speeds complement different situations: anything from really fast (1/4000) for sports photography to really slow (30 seconds) for night photography. It all depends on what you’re shooting and how much light you have available to you. Knowing how your shutter speed works is a key element in the basics of photography.
Learn to manage the ISO
The third step of controlling how your photographs look (pre-editing) is the ISO. After passing through the aperture and getting managed by the shutter speed, the light reaches the sensor. This is where we decide how to set the ISO. As you turn the ISO number up, you increase the exposure (which again, is is the amount of light that reaches your camera sensor or film). But, at the same time, the image quality decreases. There will be more digital noise or “grain”.
So that’s where, as a photographer, you have to decide upon your priorities in terms of exposure vs grain. For instance, you could reduce the image quality if it means that a motion blur would be prevented in your photo. And you have to be careful about the “grain” as there’s no possible way to fix that in post-production (as of yet).
Other things to note
Shooting modes
In basic digital photography, there are several shooting modes. They are full-auto, program, aperture priority, shutter speed priority or manual mode. So, how do you work out which one you should be using? We will be talking about aperture priority, shutter speed priority, and manual mode as they are the most creatively challenging.
In aperture priority mode, you manually set the lens aperture, while the camera automatically picks the right shutter speed to properly expose the image. You have full control over subject isolation and you can play with the depth of field because you can increase or decrease the lens aperture and let the camera do the math on measuring the right shutter speed.
In shutter speed priority, you manually set the camera’s shutter speed and the camera automatically picks the right aperture for you, based on the amount of light that passes through the lens. This mode is intended to be used when motion needs to be frozen or intentionally blurred.
Lastly, in manual mode, everything is under your control from the ISO to shutter speed to aperture and you can take it just the way you want it.
All the modes have their own functions and so when you understand what exactly each mode does, the one that will be suitable for your situation becomes a lot clearer.
White balance
Your eyes automatically adjust to different light sources, but a camera can’t do that and that’s why sometimes you take an image and it looks very blue or very yellow. Using the right white balance setting will make what’s white in real life actually appears white in the photo.
There’s an auto white balance setting, but like any automatic setting, it’s not always accurate. Therefore, you can use a preset based on what light you are shooting in, like sun or tungsten light bulbs, or you can take a picture of a white object and manually set the white balance.
Rule of thirds
This is probably the first compositional rule that any beginner photographer comes across. And that’s for a very good reason: it’s simple and it works. The basic premise of Rule of Thirds is that you divide your camera’s frame into thirds (don’t worry your camera’s setting will do it for you).
While taking a photo, planting key objects on these lines shown on the screen to make the composition as well as the overall balance/placement of the image works better. If you’ve not learned much about photography yet, it’s a great way of dramatically improving your photos as it will help you make them more interesting.
You May Like This

Department of Passport first to receive ISO certification
KATHMANDU, July 23: The Department of Passport under the Ministry of Foreign Affairs has become the first government agency to... Read More...

Yeti Flooring receives ISO certifications
KATHMANDU, March 6: Yeti Flooring has received ISO 9001 and ISO 14001 certifications. ... Read More...
ACC Premier Cup semi-final: Nepal vs UAE
17 hours ago

850 grams of gold seized from Indian national at TIA
13 hours ago


Rain shocks: On the monsoon in 2024
20 hours ago

_20220508065243.jpg)


Just In
- MoHP cautions docs working in govt hospitals not to work in private ones
- Over 400,000 tourists visited Mustang by road last year
- 19 hydropower projects to be showcased at investment summit
- Global oil and gold prices surge as Israel retaliates against Iran
- Sajha Yatayat cancels CEO appointment process for lack of candidates
- Govt padlocks Nepal Scouts’ property illegally occupied by NC lawmaker Deepak Khadka
- FWEAN meets with President Paudel to solicit support for women entrepreneurship
- Koshi provincial assembly passes resolution motion calling for special session by majority votes
Leave A Comment