Friday, 19 April 2024 01:18 AM
OR
Login using
Surya Namaskar Doing it Right
Published On: September 8, 2017 10:37 AM NPT By: Republica | @RepublicaNepal
Looking for a single all encompassing exercise to stay fit amidst your tight schedule? Here is your answer. Surya Namaskar or Sun Salutation is an ancient technique of paying gratitude to the sun for sustaining this planet.
Along with its religious connotation, Surya Namaskar has a set of twelve asanas (postures) that provide good cardio vascular workout. Many however fail to get the desired health benefits from these powerful postures as they are unable to do it correctly. The Week spoke to Dr Ramesh Gautam, Naturopathic Practitioner at Arogya Ashram, Ratopul, to help you correct your yogic postures. Read more to get the optimum benefit from this incredible exercise.
Understanding Surya Namaskar
Surya Namaskar is best done in the morning on an empty stomach. “Have warm water as soon as you get up in the morning and start your exercise half an hour later,” says Gautam. It is advisable to perform these twelve asanas outside in the open, one hour post the sunrise. Exercising at this time of the day increases fresh oxygen intake and rejuvenates your body. Ideally, you should take four to five seconds to complete each posture. The first seven poses of Surya Namaskar are repeated later to complete the set of twelve asanas. A beginner is expected to repeat this set of twelve exercises, twelve times in a go.
Health benefits
The complete set of this exercise primarily has five health benefits. Firstly, it helps improve blood circulation in your body. The active process of inhalation and exhalation helps in constantly ventilating the lungs. Hence, your blood remains oxygenated. It also helps in throwing out toxins and carbon dioxide from your body. Secondly, this is a great cardiovascular exercise and helps in weight loss. Thirdly, it also promotes regular menstrual cycle. Next, it keeps your skin and hair healthy. And lastly, Surya Namaskar improves memory and can help you get rid of anxiety and depression.
How to go about it?
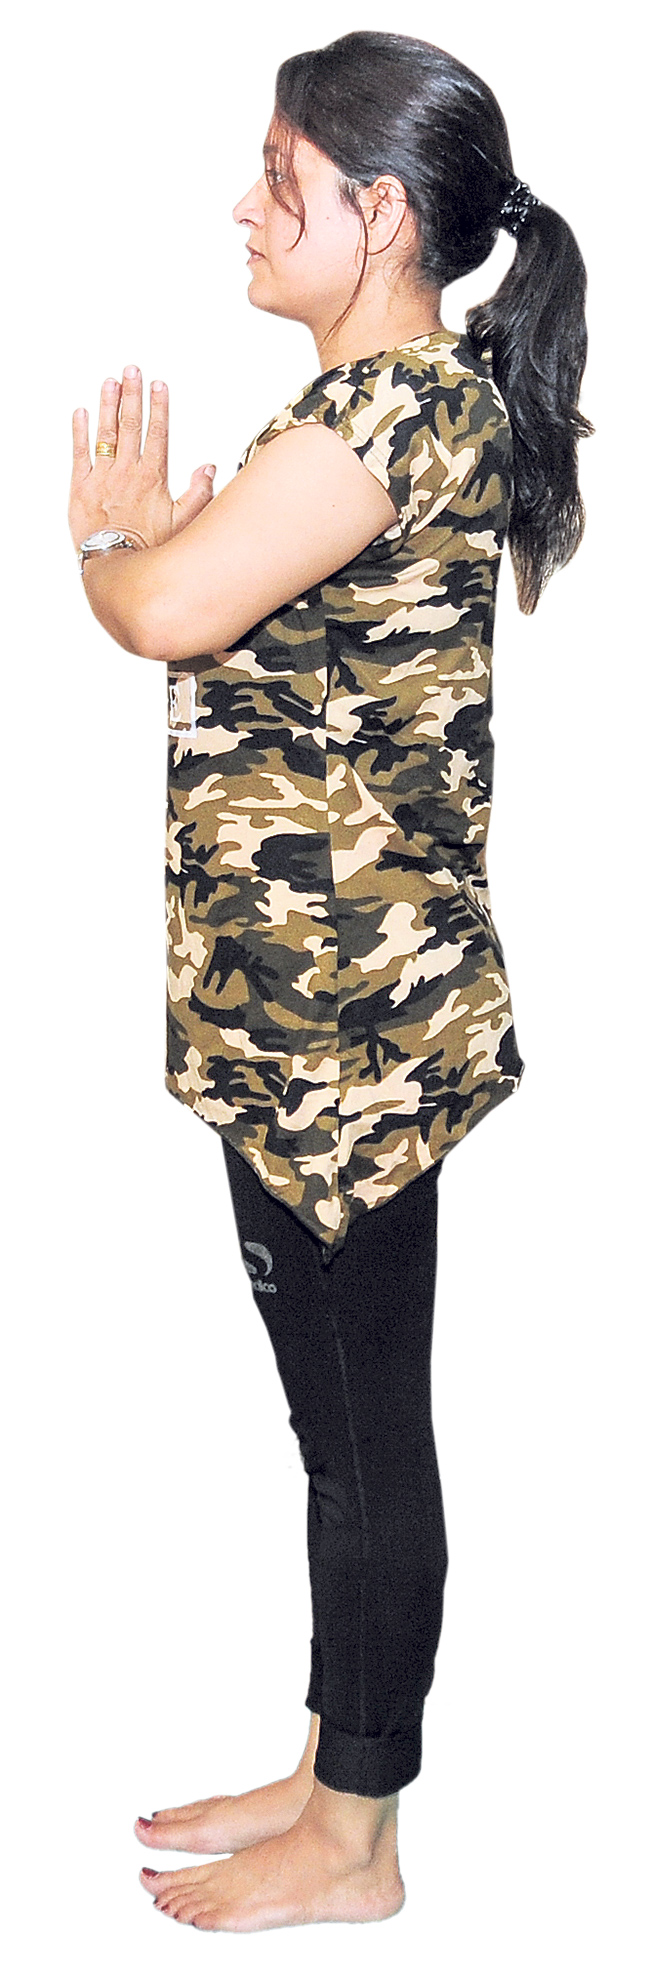
Step one (Prayer pose)
Stand at the edge of your mat and keep your body relaxed. Share the weight of your body equally between both your feet. Keep your shoulders relaxed and expand your chest. Taking a deep breath, lift up your arms from the sides. Exhale as you bring both your arms forward in a prayer position. This is a great stress buster.
Step two (Raised arm pose)
Inhale as you lift both your arms up and then back keeping your biceps close to the ears. This exercise enables you to stretch your body right from your feet to the tip of your fingers. The most common mistake which people make in this exercise is breathing incorrectly. This posture is great for your upper and lower back. It also helps in controlling thyroid problems, prevents urine infection and is good for lungs and heart.
 Step three (Hand to foot pose)
Breathing out, bend forward from your waist and keep your spine erect. Try touching your palm to the floor, right beside your feet. Those with severe back pain should not force themselves to perform this exercise. “Bend down as much as you can but don’t force yourself,” says Gautam. This exercise helps stretch your sciatic nerve which is the longest nerve in your body and keeps it healthy.
Step four (Half moon pose)
Inhale as you push your right leg backward. Bring your left knee close to your chest and look up with your arms stretched backwards. This exercise helps regulate the pancreatic juice in your body. Hence, it helps to control your sugar level and prevents any kind of stomach infection. Remember to control your breath and breathe in as you rise up.
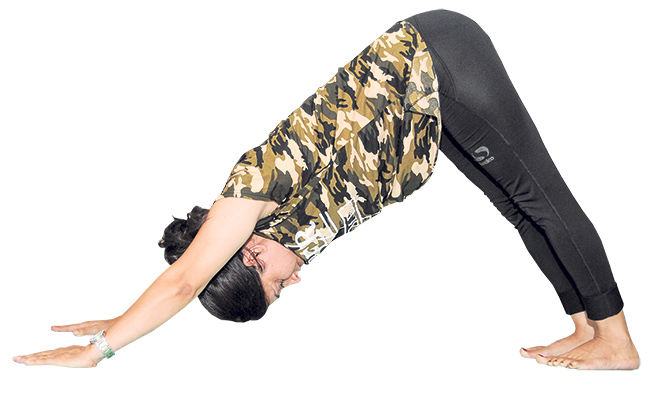
Step five (Mountain pose)
Lift your hips and bend your chest downwards, breathing out. Take the support of your fist in order to make an inverted ‘V’. If your body allows, try keeping your heels on the ground. “This exercise is good for your back,” says Gautam.
Step six (Salute with eight parts)
Bring your knees gently to the floor as you exhale. Eight parts, comprising of two hands, chin, chest, two knees, and two feet should touch the floor. You must try to stop your breathing in this exercise. Make sure you push your hips slightly upward. This exercise increases your stamina and is extremely good for heart and lungs.
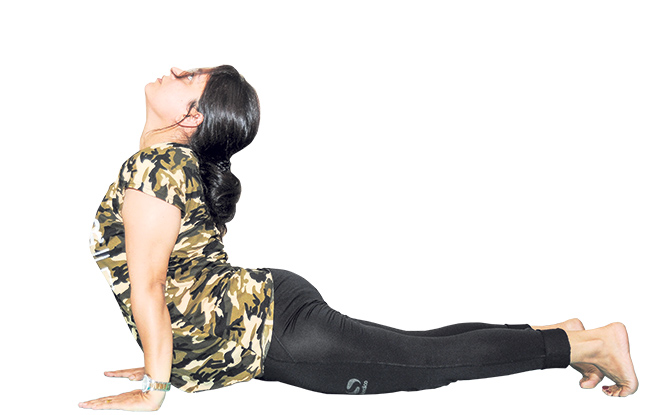
Step seven (Cobra pose)
Inhale as you lift your head in a cobra position. Your palms must touch the ground along with your thighs, knees and feet. Widen your eyelids as you rise up. This posture helps improve your eyesight. This exercise will also maintain your mental balance and help overcome anxieties and depression.
Step eight (Mountain pose)
After the seventh pose, the exercises begin to repeat again. Replicate the fifth step by lifting up your hips. Make an inverted ‘V’ with your body, to make it look like a mountain.
 Step nine (Half moon pose)
The eighth pose is again the Half moon pose where you must inhale as you push your right foot backward. Lift your arms backward keeping them close to your ears. Push your left foot backward and keep your right foot in the front for the next set of Surya Namaskar. This way change your feet alternatively with every set.
Step ten (Hand to foot pose)
Concentrate on your breathing and exhale out as you bend forward to repeat step three. Bend forward with your spines erect and try touching the floor with your palm. Ideally your forehead is supposed to touch your knees. But never force your body to do so as it may lead to severe back problems.
Step eleven (Raised arm pose)
Feel relaxed and stretch your body as you lift your hands up. Exhale while bending your back. Never make the mistake of jerking your body while you bend backwards.
Step twelve (Prayer pose)
As you exhale, first straighten your body then bring your hands forward. Relax as you widen your chest. Observe the sensations in your body and get ready for the next set of Surya Namaskar.
You May Like This
Doing it right
Transitional justice is always a messy affair but Nepal’s transitional justice process has also been needlessly complicated and prolonged ... Read More...

State min: Right on reproductive health to protect women's reproductive right
KATHMANDU, April 10: Minister of State for Health and Education, Padma Kumari Aryal, has said that Act related to reproductive health... Read More...

Apply it right
The most basic thing you can control while applying makeup to make sure you don’t look like a clown when... Read More...


Just In
- Govt receives 1,658 proposals for startup loans; Minimum of 50 points required for eligibility
- Unified Socialist leader Sodari appointed Sudurpaschim CM
- One Nepali dies in UAE flood
- Madhesh Province CM Yadav expands cabinet
- 12-hour OPD service at Damauli Hospital from Thursday
- Lawmaker Dr Sharma provides Rs 2 million to children's hospital
- BFIs' lending to private sector increases by only 4.3 percent to Rs 5.087 trillion in first eight months of current FY
- NEPSE nosedives 19.56 points; daily turnover falls to Rs 2.09 billion
Leave A Comment